Bambu Lab Slicing Guide
Slicing for auto ejection is different from slicing for manual printing. Please read this document before attempting auto ejection on your Bambu Lab printers.
Requirements
- Check for Slicer Version Compatibility
- Stay Within Dimensional Limits
- Center the Model
- Download AF3D Profiles or Use Your Own Profile
- Export as "Plate Sliced File"
1. Slicer Version
Please use Bambu Studio version 1.9.0.17 or newer.
Alternatively, you can use OrcaSlicer version 2.0.0 or newer.
2. Dimensional Limits (X1 and P1 only)
Auto Ejection on the P1 and X1 series printers reduces the usable print volume. The following are the maximum dimensions for parts that can be auto ejected:
X Limits: 0-256mm (unchanged) No dimensional restrictions on the X axis.
Y Limits: 0-200mm The rear section of the bed needs about 50mm of clearance so that the hotend can move behind the part to eject it.
Z Limits: 5-200mm For proper removal, parts cannot be too short or too tall. If you send a part outside of these dimensions, it must be printed in Manual mode.
3. Center Model
Auto ejection works best with one part at a time in the center-front of the bed.
The first ejection sweep happens at the center of the bed, so if your part is off-center, it may not be ejected properly. When doing part layouts, consider if it will get caught somewhere before exiting the front of the printer.
If you print multiple parts in a batch, they may fail to exit the print area properly.
4. Download AutoFarm3D Profiles
To make your life easier, we provide default profiles for VAAPR. We recommend starting with our profiles and tweaking settings as needed from there.
If you don't see the material or printer profile you need, please proceed to section 5 to see how to adjust your own profile.
4.1 PLA Profiles
Our profiles provide a starting point for you to dial in your settings. While they should work well for most prints, larger prints may require some tweaking.
5. Using Your Own Profile
Follow this section if you are not downloading our preset AutoFarm3D profiles.
5.1 Check Settings
Make sure you have done the following:
- Sliced with the “Smooth PEI Plate / High Temp Plate” setting in Bambu Studio.
- Disabled the layer fan for the first 3 layers.
- Ensured AMS slots in your slicer correspond correctly to the order in which colours are loaded on your Bambu.
- Kept the start and end gcode as it is. AutoFarm3D is built to work with the default bambu gcode and will automatically process your files for automated removal.
VAAPR usually works well with Bambu Lab's default profiles. If you have issues with adhesion, try raising the bed and nozzle temperature each by 10ºC. If that does not work, please contact support.
5.2 Remove Purge Lines
The P1 and X1 series purge lines at the front of the bed are too thin to be ejected. If you would like to remove them, please import the provided profiles below.
AutoFarm3D Profiles
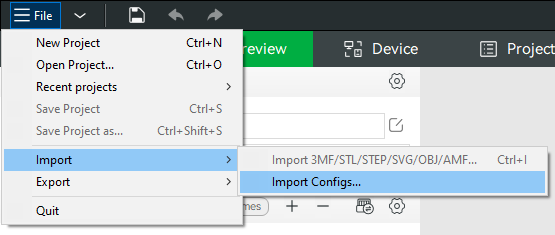
To import the profile in Bambu Studio or OrcaSlicer, go to File > Import > Import Configs...
Once you have imported the profile, make sure you have it selected before slicing new objects.

Note: If you do not want to remove the purge lines entirely, you can intersect them with the part you’re printing so they get removed together.
6. Export as "Plate Sliced File"
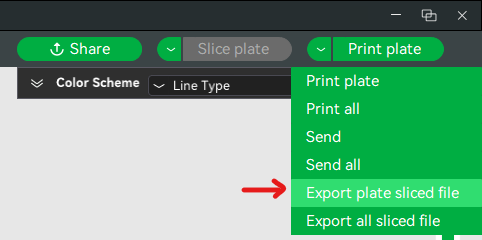
When exporting a file from OrcaSlicer or Bambu Studio, export the object as a “Plate Sliced File”. This will output a file with the extension .gcode.3mf. Bambu Printers reject all other types of file (regular .gcode, .3mf projects).